Hi there. My name is Gary Hughes, and I'm a technical product manager here at Quest. Thank you for joining me for today's video for the Migration of Teams Chats and Microsoft 365 Groups within On Demand. Let's jump right into the demo.
So here we are in our Migration dashboard for Microsoft teams. We can now change into the Microsoft 365 Groups tab at the top. And from here, we can configure this discovery job to find and display all groups from the source tenant automatically, which do not have an associated Microsoft team. Or we can go ahead and upload our own CSV file, which has the to be migrated Microsoft 365 Groups already listed. Run the discovery task within the teams tab to include the groups which do have an associated team.
To improve our migration, we can also opt in to collect further statistics related to Microsoft 365 Groups from the source. Please also note the Azure AD administrator account will be added to the discovered groups for migration purposes. Just like nearly all tasks and jobs window On Demand, we can now decide if we want to run this task now, later, or at a scheduled time and date.
Up next, we get a quick summary of a task in which we can also define a custom task name. And with a click on finish, our discovery tasks will be added to the task list in On Demand. Now with the discovery and statistics task completed, we can go back into our M365 Groups tab and find all groups which are not associated with a Microsoft Team in the list below.
The status and workflow columns are a great indication for what the status of the migration is for these groups and will be updated accordingly. We can also see important information about the groups in this view such as members, plans, and tasks. These groups are now ready for the next step in the migration, which is the provisioning on the target.
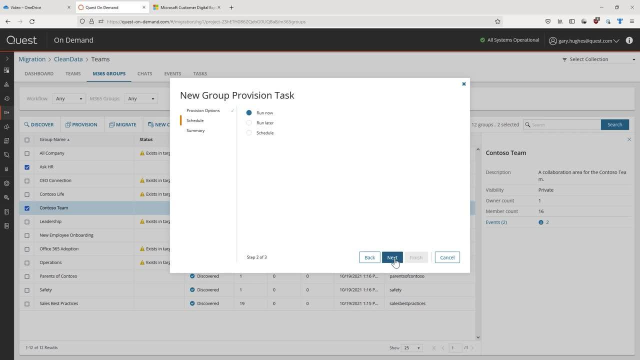
We can go ahead and select our desired groups and click on provision. For the provisioning, we can now decide what should happen if a group already exists on the target. We can have do not provision such groups at all, provision a new group with a specific suffix, or simply merge such groups together. It is also possible to suppress the automatic welcome message a user will receive when they've been added to a new group on the target.
Up next, we can also determine how we want to handle any multi-geo tenant situations. Leave the preferred data location to none. If the target tenant is a multi-geo tenant, all groups will be migrated to the same region as the target admin. Alternatively, select the geo location configured for the target tenant.
Once again, we can schedule the provisioning task for a later point in time if desired, and can confirm our configuration on the summary page. With a click on finish, a task will be started, and our selected groups will be provisioned to the target tenant.
Once the provisioning task is completed, we can go back inside M365 Group tap, and quickly identify our two groups, which we've now newly provisioned on the target. We can now start with the migration of these Microsoft 365 Groups simply by selecting our groups and clicking on migrate.
From here, we can define how we want to migrate our Microsoft Office 365 Groups. Of course, with every 365 Group migration, the group mailbox will be included. We can also decide to migrate associated collaboration tools, which includes the SharePoint sites, files, OneNote, and other supported tools. And we can also include Planner.
Once again, set the schedule, check the summary, click on finish to run the migration task. Now that the migrant groups task has completed, we can go back into the tab, and we can see that both of our groups have successfully been migrated to the target tenant.
So moving onto the migration of teams chats. We can change into the chat section. From here, we can run an over discovery job to find users who have private chats in the source tenant, and we can either do this based on all users from the source tenant. Alternatively, run this against the match users only from the account mapping at the very first stage.
Once the discovery job has run, we again get a full list of all the individual users who have chats in the source tenants. And from here, we can quickly understand their individual OneDrive status, how many chats they have. If you have migrated individual users and the users have chats with other users, their status workflow will also update to partially migrated, and you can see how many chats have actually been migrated from the individual user.
For the migration, select the individual user or users you're looking to migrate. Select migrate, and from here, we can now define how we want to migrate these team chats. The options for the teams chat migrations include the option to merge messages for a quicker migration. We can also migrate chats with any unmatched users, meaning users who have also been deleted or disabled from Active Directory, and we can also opt in to skip on the OneDrive status check. This is essential because any links which have been shared to OneDrive files attached in the chat will either work or not work depending on if the OneDrive has actually been provisioned and migrated beforehand.
For scheduling this particular task into the scheduler and a quick summary, click on finish. and the migration will start. And complete.
For more information, including technical documentation, white papers, and data sheets, please visit quest.com/on-demand. Thank you for watching.
 05:25
05:25
