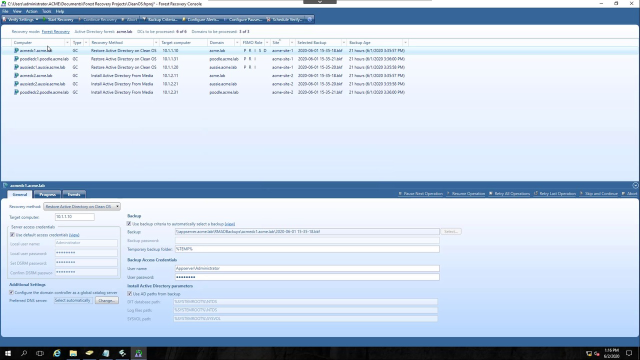
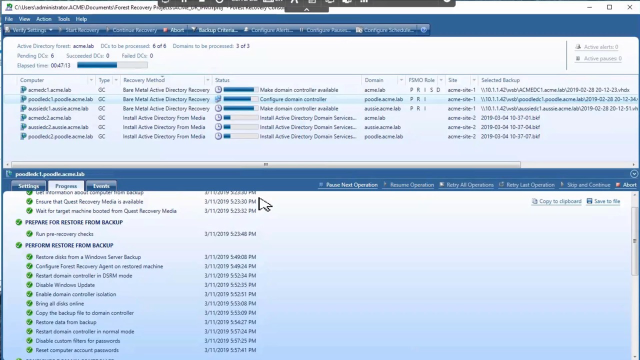
Well, welcome back. Here's another video showing Quest Recovery Manager Disaster Recovery Edition. And we did create a forest recovery project recently, so let me just go ahead and relaunch my Forest Recovery Console. And I can go ahead and type my super secret project password in, and we'll have the project come up. So we can see there are 3 DCs that were set to bare metal. There's three DCs that were set to install Active Directory from media.
But let me just introduce you to a couple of the areas on the console first. You can see the top here. This is a list view. It gives you all of the DCs that are in your forest. Down below, there's a detailed view, and you can see everything grayed out. If I highlight a DC, you can see the fields are filled in for me. And you can see that this is all these settings and peripherals for the DC that I highlighted, which is also listed here.
You'll notice also, there's a Progress and Events tab. Those tabs are not used yet. But as I'm setting up my project, the way that I pick which recovery method I want for each DC is by highlighting the DC and then choosing it from this dropdown. Or I could multi-select by clicking Control Click or doing a Shift Click and selecting multiple DCs. And then I'm able to change those recovery project settings here very easily to whatever I want for the DCs that I have highlighted.
Now, we talked about the detail. We talked about the top. Let's talk about the toolbars. This is the main toolbar just below the menu. And you can see here these are all really main process pieces, so we'll get into those details. There's verify setting, start recovery, continue recovery if your recovery was paused, abort, backup criteria, configure alerts, and configure pauses. Down below, when I've highlighted a DC or even a group of DCs, I get some other toolbar buttons down here that allow me to navigate the recovery process should I run into problems, and say something failed or if I set a pause at a particular time.
I could then do that, or if I wanted to set a pause during the recovery process to check something out maybe on that DC before letting it continue. There is an Abort button over here. This abort button is for the DC or DCs that you have highlighted. There is another Abort button up here. This aborts the entire forest recovery project. So if you're in the process of recovery, and you know something's gone horribly wrong, and you want to abort the whole thing, you can click this.
Both of these require the Forest Recovery Console to communicate to the agent to abort. And that doesn't happen until the agent checks back in to say, OK, I've finished a step, or do you have any updates for me. And so clicking Abort does not mean that the process will stop immediately. Let's talk about backup criteria and automatically selecting backups. Recovery Manager makes this pretty easy for you. We give you a Backup Criteria button here in the toolbar. And this will select backups automatically for you across all the DCs in your environment.
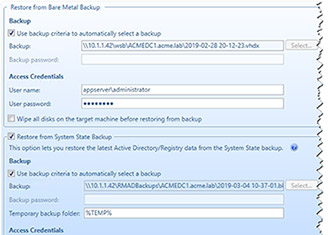
Typically, you'd use the latest backup. And that allows you to select backups that were created most recently. And you can see these guys were 4 minutes ago at 10:02 and 2 seconds or 5 seconds or 9 seconds. So these just ran. If I look at my bare metal backups, these are 30, 40 days old. But again, we do that for the bare metal, and then we follow up with a system state backup, which, like I said, is hopefully from last night or just today. These ones are just for a few minutes ago.
But let's pretend that I didn't consider these backups good, that my virus attack actually started somewhere on the 9th, and so I wanted to make sure I used backups that were from before the 9th. So I'll click on my Backup Criteria. And then I'll click-- instead of the Use Latest Backup, I'll say Use Backups Created Before. And I'll say before the 9th and then after September 6. So I'll go to September 1, and I should still have backups there.
Now, you see this checkbox. It says use backups on DCs whenever possible. This is a little bit of a throwback to Forest Edition Recovery back when the directory really was the only thing that we were concerned about being corrupted. That was the case in 2006 up to about 2012, 2014. And then we started seeing ransomware in attacks or some other malware that was attacking the operating system of domain controllers. Now you need to have bare metal, and that's why we built the Disaster Recovery Edition to do that bare metal recovery.
With bare metal, you don't want to store your backups on the DCs anymore. You need to place them somewhere where they're secure. You could use this checkbox. It's not going to hurt anything to leave it on. But you're probably not going to use backups that are stored on the DCs. All right. And you can see here now my backups are from the 8th, so the day before the 9th, which is what I told it to do. Even in my system state backups, you can see these are from the 8th. So each domain controller has automatically had those backups selected. Great feature. It saves you a lot of time in getting the right backups for your recovery.
All right. We want to get into doing a couple of things, like updating the Forest Recovery Project. So I'm going to go ahead and do that. I can do that off the Tools menu. I go here to Update the Forest Recovery Project with Changes in Active Directory. One of the things that you'll notice is my project doesn't seem to know what FSMO roles are available. And it won't know that until I check for changes.
You can see here it found three domain controllers that have some modifications, so I'll update my project with those changes. And you can see now FSMO roles-- PDC emulator, RID master, infrastructure master, schema master, domain naming master-- say that five times fast-- are on the top, and then, of course, the three sub zones for the two child domains as well. That looks good. I'm going to save my project again.
And let's get into some of the other tools stuff. OK. Let's go through the menu items just one at a time here. I'm going to start on the View menu. And you notice that there is this option for me to create a recovery plan. This is basically a document that we create based on the project's settings that you've built. And you can export this document out to Word, for example, and then modify it how you want, put whatever other documentation you want within it. And it gives you a good template to allow you to show your forest recovery process based off of what the product itself has done.
So here you can see I've got three domain controllers. I'm going to do a bare metal recovery in all three domains. I have two sites and 3 DCs in each site. Again, I have not ran this forest recovery process, so I am not actually making any changes yet. And then I can tell for each domain, each domain controller, which recovery method am I going to use. There's my DC recovery settings, my DNS servers. And you can see here for ACME DC1, I'm restoring from Windows Server Backup. Anyway, all the details are here. And this is really a nice template. It even gives you some specific details as to what each step in each stage of the process does. Great information.
To export it out to Word, you simply click here and export to Word. You'll notice that grayed out here is a report option. After you run the recovery process, you can run a report, and that will show you where errors occurred, what time they occurred, and some other information as well. Or you could export those results out from the events and everything in the console.
So that's the View menu. The Action menu actually has the same buttons that you see in the main toolbar. And so there isn't anything really different here-- verify settings, a couple sub-menu items on the Verify Settings, such as just verifying the selected DCs. So this would only verify Acme DC1 because I have it highlighted. Or I'm scheduling your verify settings to run. And if you do that, you can actually set a schedule and have it run, say, daily in your environment so that your forest recovery project is always up to date. It's probably a smart thing to do.
So that's the Action menu. OK. On the Tools menu, we have a lot of different settings. You saw us use this Update Project with Changes in Active Directory. The second option will actually launch the console we use for configuring backups and doing online object and group policy recovery. We could, if I wanted to, connect to the DC I have highlighted via RDP. And I can simply click that, and it will launch an RDP client right from here to allow me to connect to that server. And we can go ahead and put in our credentials here. And we'll launch remote desktop to that server. OK? So that's good for that.
If you want, you can create an RDC Man group if you use the RDC Manager for remote desktops. And it will include all of the DCs in your environment, and then you can just do that right here in the desktop. Or there's these other options-- manage, diagnose, recovery project settings, and fault tolerance. I'm going to walk through these one at a time. There's quite a few options in here, so we'll handle those.
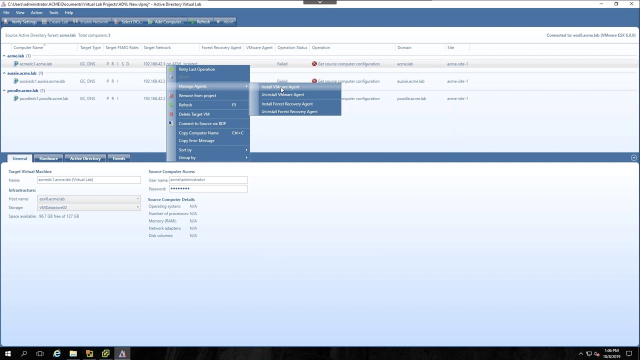
OK. On the Manage menu, I have Forest Recovery Agents or DCs, FSMO Roles, Global Catalog Servers, DNS Client Settings, and then the Purge Kerberos Tickets option. Down here on the first one, you can see all of my DCs are listed here. And I can see what agents they have installed, what boot mode they're in, their current IP addresses. And this just tells me that yes, the forest recovery agent is installed and ready to function.
If I highlight one of these, I can decide to uninstall the agent, restart the agent, reboot the server, either into normal mode or into DSRM, or I can decide to reset the DSRM password. Now, when I reset the DSRM password, I could set it to the value that's in my recovery settings. That's what's down here. Or I could pick a new password and reset it. And by the way, I can multi-select. I could even check here and reset the password for-- the DSRM password for all of my DCs from one central console. It's a pretty cool feature.
That's a pretty good summary of the manage domain controllers or agents. If I move on to the next option, it's the FMSO Role option. And here I get a list of all the FSMO roles and what DCs they're on. I can assign those FSMO roles to another DC simply by clicking here and choosing another DC within that domain. And we'll go ahead and apply that.
I'm not going to make that change. I just wanted to show how that option works. We also do use Microsoft best practices to suggest FSMO role owners, and so you can see some of those changes shown here. Again, I'm not going to make those changes today either. But if I had clicked Apply when those were on, it would simply have moved those roles. Here's Global Catalog servers. This is a great way to take care of a DC that may have gotten a lingering object after a forced disaster, or maybe just because it got a lingering object during normal day-to-day operations.
If I highlight a DC, I can see that the Global Catalog is checked or unchecked here. So I could go ahead and uncheck the ones that I don't want to be global catalogs anymore. And then if I click Apply, that's what will happen. It will no longer be global catalogs. So I could do that-- uncheck them and then recheck them, and they will go ahead and go through the GC rebuild process again. I'm not going to do any of these changes either, so I hit the Clear button, and I'll cancel out of this dialogue.
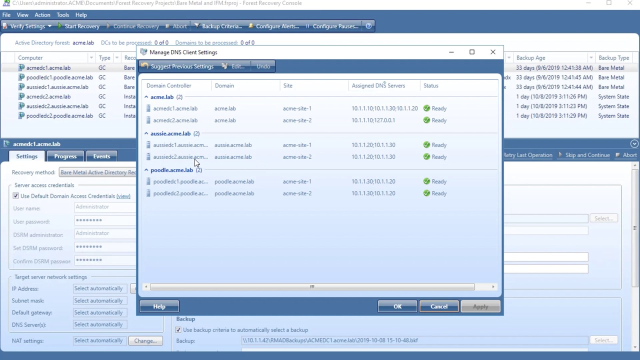
The last one here-- well, second-to-last one-- the DNS Client Settings. Now, for DNS Client you can actually see all your DNS Client settings here. If you need to edit one-- like, for example I always find it a best practice to use the local DC as the secondary or maybe the 127.0.0.1 IP as a secondary. I can double click on here and simply add that 127.0.0.1. And I've added that now as an alternate or secondary DNS server on this box.
And you can see here it has pending changes. So I could make those changes on every DC if I wanted to. And then go ahead and just click Apply, and it will apply those changes again to the environment. You can also suggest previous settings. We do save settings within the project, and so these are what some previous settings were. And then go ahead and apply those. Or again, you can highlight any one of these. Either double click to edit or click and hit the Edit button up here at the top. I'm not going to make any these changes either, so I'll click the Cancel button and then say Yes.
The last menu option under Manage is Purge Kerberos Tickets. This is a new feature that came in in 9.0 or maybe 9.0.1. The problem is if you're doing recovery testing and you create backups and then immediately go into a recovery test, the KRBTGT account tickets, the Kerberos tickets from the KRBTGT account, are still alive. They have a lifespan of about 10 hours. They're not actually valid anymore, and so that causes problems when people are trying to authenticate, things like that, because the KRBGT account itself has its password reset twice during recovery.
So we built this little utility. All it does is allow you to purge those tickets. And it does it very quickly, and then you're done. OK. Let's move on to diagnose. There's two options in diagnose-- Check Forest Health and Collect Diagnostics Data. I'm going to start with the bottom one. This is a feature that we added that allows you to collect the logs from all of your domain controllers as well as your Forest Recovery Console. Now, we collect Recovery Manager logs, but we also collect the Windows Security application and system logs, and I believe Directory Services logs.
And we zip all those logs up into a file which you specify a folder for here. So that folder is already specified. If you need to put this onto a file share, you can add credentials for whatever account it is you need to use to reach that share. And if you'd like to delete the logs you've collected, just the Recovery Manager logs from your domain controllers, simply check this box, and it will delete those logs from the domain controllers as well.
So I'll go ahead and click Collect here. This does take a good period of time to run, so I'm just going to pause the video and let it finish that process. OK. And you can see that process finished. I'll go ahead and open the ZIP file so we can look at it. You can see in my lab, it's only 20 megabytes. I can imagine it can get to be several gigabytes in a production environment, especially with hundreds of domain controllers.
And inside, you can see there's folders for each DC. And inside of those folders is another ZIP file, and those ZIP files contain all sorts of information. So just really good to have this data, have it collected. If you have a support case open, support will give you a secure way to send that log data in. The last option in the Diagnose area is Check Forest Health. We run four different tests on Check Forest Health. We do a check just to make sure each domain controller is responding. We then check replication between each replication node and for each partition.
We do a domain trust test. These are internal trust relationships, not external trust relationships. And lastly, we create a user account and then log in with that user account. And that makes sure that the user authentication is working. The RID master must have published RIDs because you got a RID to create the user account. And the Global Catalog is working. Otherwise, the user's login could not finish.
So this last option is not checked by default. If I uncheck it and recheck it, you'll see it will pop up. We don't do this by default because some companies have a policy around the creation of user accounts, and we don't want to step on that policy. Let's go ahead and run this. We see a progress bar up here, and it actually does run pretty quick enough. In a small lab like mine, it would take a little longer where there's 50 or 100 domain controllers. And everything finished good.
If you did have warnings or errors, you would see those listed here, and you'd see a little red wedge. You can go look at those details. Errors and Warning show up by default. If you want to see the Informational tab, you can see that. Just click on the tab, and you can see all the DCs were reachable.
I'm going to go into Active Directory application. I can see each node that got replicated and just where it replicated to and from. And then lastly, we've got to domain trusts in user authentication. So there are the trust relationships. The root domain has the most trust relationships. And here are the RID master and GC operations. That's forest health.
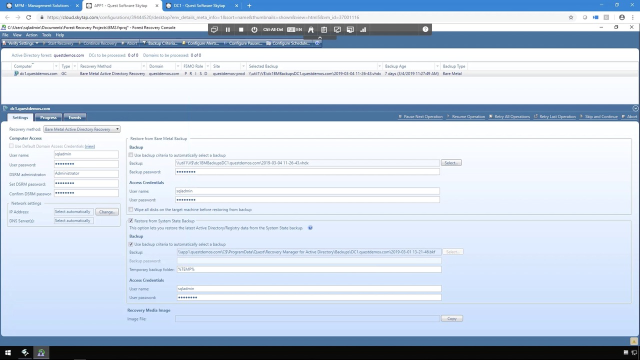
Let's review recovery project settings. Now, we've looked at this a little bit already. Remember, we went in and we added our credentials for each of the domains. We did that when we created the forest recovery project. But I wanted to show you the other features here as well-- forest recovery, domain recovery, or SYSVOL recovery are our three types of recovery, so you can decide here in your project which recovery method you're using. SYSVOL recovery is great because it restores SYSVOL on every DC, and it doesn't wait for replication, so it's much faster than if you did this manually on your PDC Emulator. Go to the Global Catalog tab.
We talked about this a little bit too. We have three options-- rebuild the GC and advertise normally, which is what Microsoft recommends, which is why we say recommended here. There is rebuild the GC and advertise fast, and then there's keep the GC intact. The middle option, this rebuild and advertise fast, I'm not a very big fan of this, because I think it's going to cause confusion, especially if you use universal groups.
What happens is the Global Catalog starts to rebuild, but it advertises itself as ready even Though it hasn't finished replicating all the partial attribute sets yet. And that means if a user was a member of a universal group and they logged on, they'd be able to log on, but if that universal group gave them access to a particular resource-- say an application or a file system-- they wouldn't have access, because they don't have that group membership yet.
So then what do they do? They'll call the help desk. So I'm not a very big fan of advertising fast. My favorite is still keep the GC intact, and I explained why earlier. Recovery Manager keeps tight control over backups. And the chance of introducing a lingering object-- even though we say greatly increases the risk, it isn't really that big of risk. And it's much better to deal with those lingering objects on a few accounts than it is to keep all your users out for as long as it takes to rebuild the global catalog.
Let's move to notifications. We talked a little bit about this age difference. When you do the backup selection criteria, if you remember that, we select backups within a certain time range or date range. This notification allows us to see whether or not a backup exceeded a 24-hour period. Now, this is just for the Active Directory system state backups. And 24 hours is pretty tight, but maybe you're really paranoid. You could switch this to, say, 8 hours. And then if you had a backup selected automatically that went beyond the 8-hour threshold-- there is a skew of more than 8 hours between your backups-- you'd get a little yellow triangle here in the corner and maybe a balloon pop-up. So that would be a good thing.
We also have email notifications. We can send an email when a verification process completes or when recovery process is completed. Remember, we can schedule verifications, so the verify settings. So that's a good thing. Here's the email address you'd put in. There's also an Email tab here at the end. And this is where you define an SMPT server and give it a sender SMPT address, et cetera. You probably don't want to use your exchange server. Hopefully you've got maybe a Linux box or some other exchange SMPT account that you could use to do those sendings.
Now let's talk about the Agents tab. This is a relatively new feature. It allows you to specify the port that the agents are going to use for communication. Now, we're going to talk a little bit more about agent communication. Normally you'd leave this at defaults. But if you did, then you can see here it says it uses RPC dynamic port ranges by default. If you did need to lock that down to specific ports, here's where you would configure it.
OK. Let's talk about the last part of the menu, Fault Tolerance. There's really two parts to Fault Tolerance. There's Settings to give the console fault tolerance, and then there's certificates that we use to communicate between agents and the Forest Recovery Console. We don't use Windows authentication or Windows encryption. We use certificates because we want to make sure we're able to communicate to our Forest Recovery agents in the event that Active Directory is still down. DCs are actually still-- the operating systems and the DCs are still functioning.
So if I go into Settings, the way we cause fault tolerance to work for the console is to write every step of the recovery process out to a database. And I typically use a SQL Express database on the Recovery Manager server itself. And so I use local Windows authentication to get to that server.
However, if you're using a commercial server, you could specify that hostname and instance here. And then I would use SQL Server authentication. I wouldn't rely on Windows authentication, because again, Active Directory is probably down. And come to think of it if, Active Directory is down, maybe your SQL Server has been destroyed as well. So using this console when using a database that's external from the Recovery Manager server is probably not going to happen anyway.
Just really quickly, the database for this process does not need to be backed up. It does not need to be maintained. It's only used when recovery runs. And as soon as recovery is done, the data that's in that console really isn't used at all. So don't feel like this is something that your database team needs to be aware of and maintain. They don't need to take care of this database.
And if, for some, reason during recovery, you came in and the console wouldn't launch because it couldn't connect to this database or your force recovery process couldn't start because it couldn't reach this database, it is safe to just uncheck this box and proceed with recovery. The only thing you want to be sure of is that the Forest Recovery Console does not inadvertently get shut down during the recovery process, and you'll be fine.
Enough talk about that piece of fault tolerance. Let's talk about certificates. We use certificates to talk between the agents and the consoles. And so if you had multiple Recovery Manager servers-- I know a number of our customers have Recovery Manager servers in each region of the world, say Americas, a Europe, and maybe Asia-Pacific. You'd want to make sure that all of those consoles were using the same set of certificates. And that way, any one of those consoles could talk to any of the agents in your forest, which could span the globe.
To take care of that, you can export the certificates first. And I'll just export this out to my desktop. And there is my certificate. I'll give it a password. Use my super secret password, and I'll click OK. And you can see here's the file that it created. It's an agent certificate file.
I take this file, I copy it to another one of my Recovery Manager servers, and then I'd simply go into Fault Tolerance and Import Certificates and pick that file name. And when I import those, that causes that console to use the very same certificates that the other console used. And that's it.
So that concludes our video talking about the overview of all of the Recovery Manager components in the Forest Edition Console. Have a great day.
To learn more about Recovery Manager, visit us online.
 22:57
22:57